# 2. How to Use Conflux IDE

## 1. Write a contract

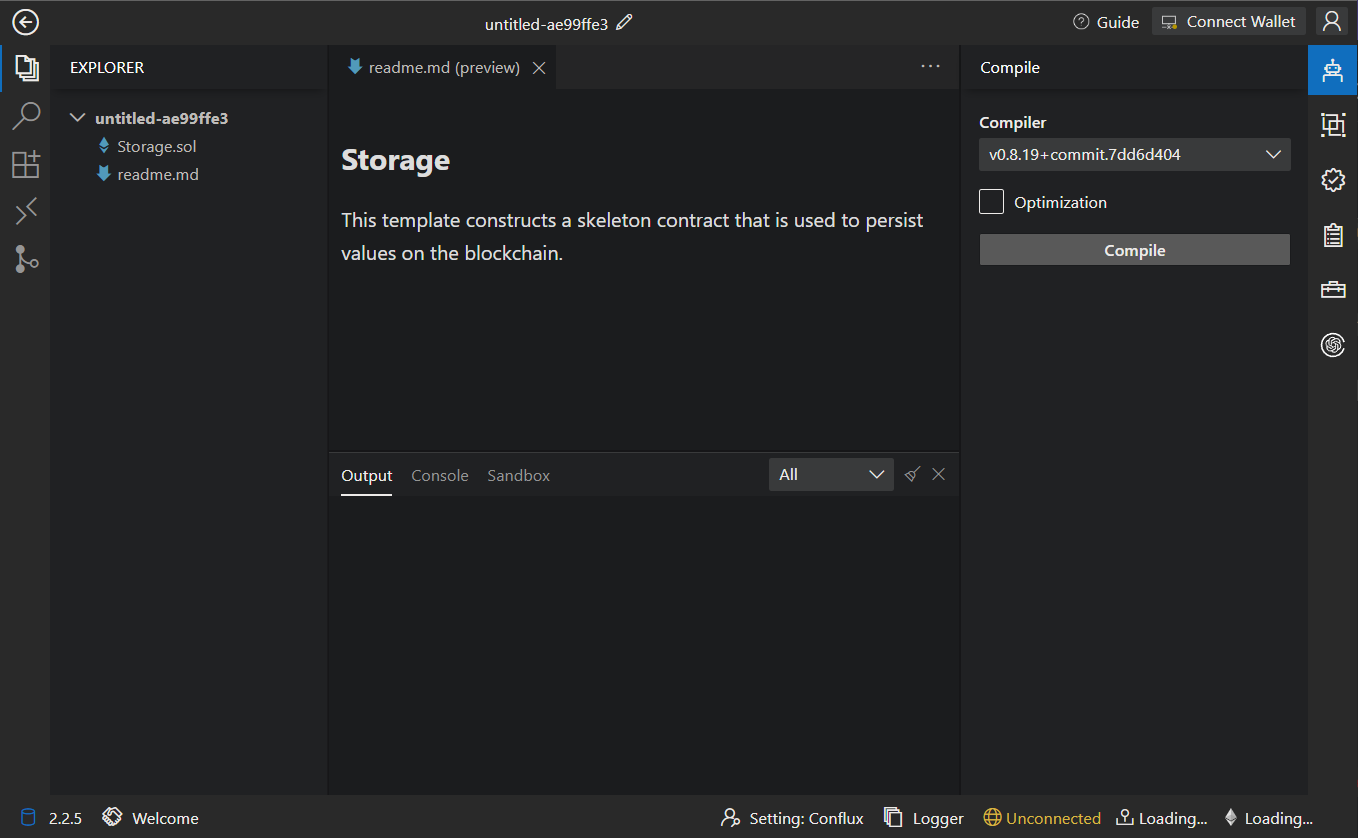
Upon entering the project, the README.md file included in the folder will be automatically previewed.

<figure><img src="https://3745657014-files.gitbook.io/~/files/v0/b/gitbook-x-prod.appspot.com/o/spaces%2F-MYy-lqJKjq1m0yBAX4r%2Fuploads%2F9wHgVzrhKOHGp2oqERwK%2Fimage.png?alt=media&#x26;token=203c21d7-1812-4aa6-9146-26f91c9d7339" alt=""><figcaption></figcaption></figure>

In the Explorer panel, you can create new files (or folders), refresh the directory, and download files. You can also directly click on the files that come with the template.

<figure><img src="https://3745657014-files.gitbook.io/~/files/v0/b/gitbook-x-prod.appspot.com/o/spaces%2F-MYy-lqJKjq1m0yBAX4r%2Fuploads%2FE2cSwSZdbKLZK5YN7XGK%2Fimage.png?alt=media&#x26;token=47ea9493-d238-474e-ab62-17a9d1f83dd3" alt=""><figcaption></figcaption></figure>

Click on a contract file to edit the code.

<figure><img src="https://3745657014-files.gitbook.io/~/files/v0/b/gitbook-x-prod.appspot.com/o/spaces%2F-MYy-lqJKjq1m0yBAX4r%2Fuploads%2Fc3NCif0cmQb6idg1jY4z%2Fimage.png?alt=media&#x26;token=a3bfae68-88a5-480d-b296-de50afd1b019" alt=""><figcaption></figcaption></figure>

## 2. Compile a contract

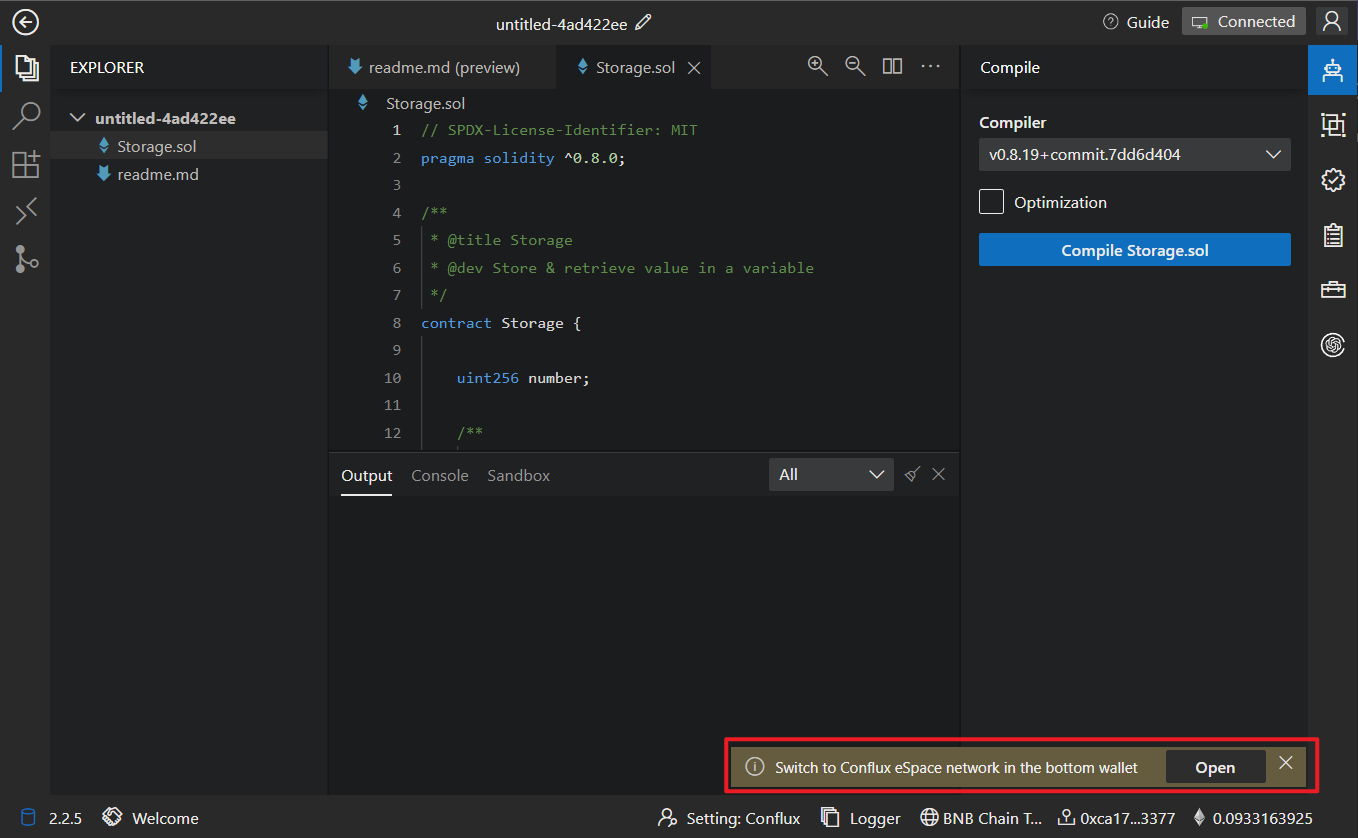
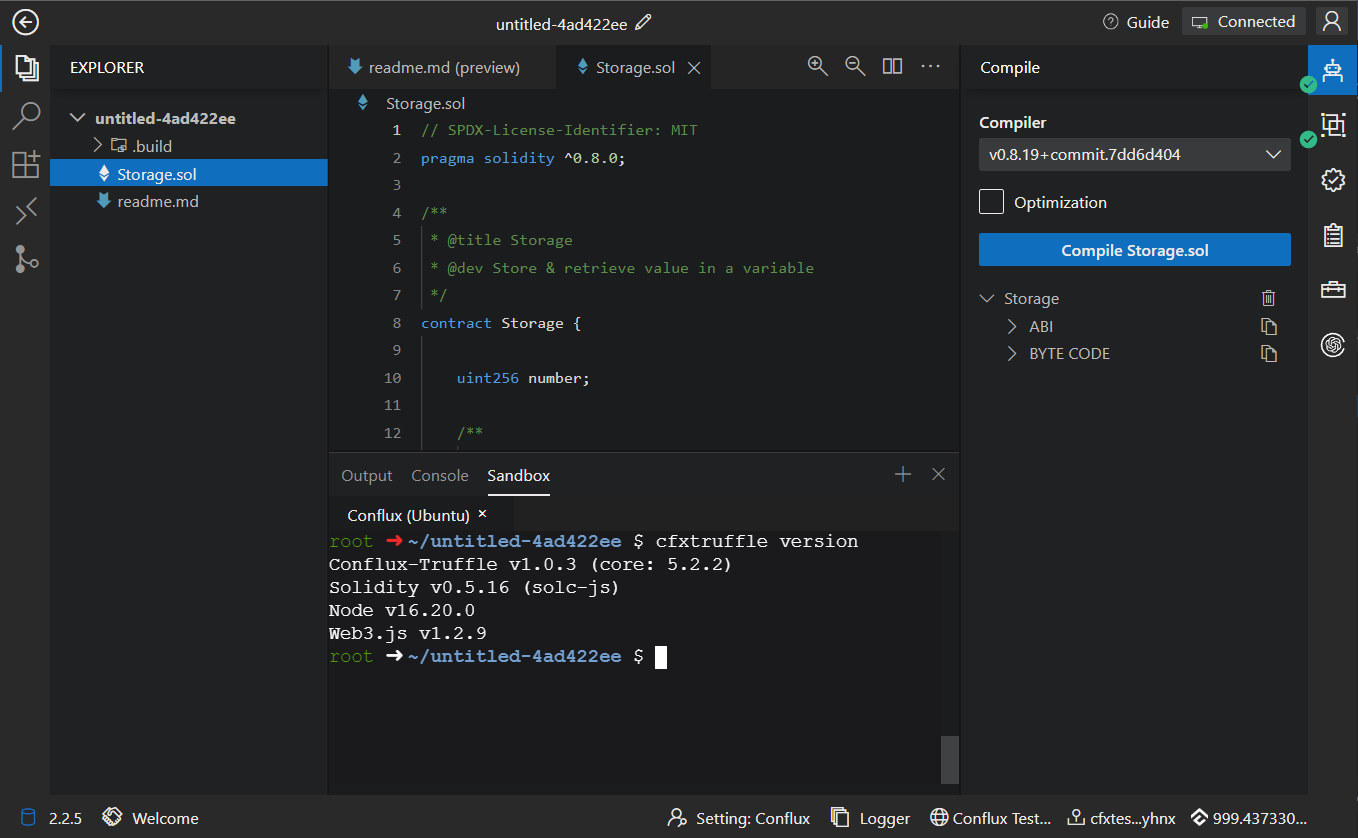
Once your contract code is written, click on the "Compiler" button in the right-side menu to open the compilation module. Choose the compiler version and decide whether to enable optimization, then click "Compile \*\*\*.sol" to initiate the compilation.

<figure><img src="https://3745657014-files.gitbook.io/~/files/v0/b/gitbook-x-prod.appspot.com/o/spaces%2F-MYy-lqJKjq1m0yBAX4r%2Fuploads%2FzPihvBLlz6HaiG0W41EG%2Fimage.png?alt=media&#x26;token=75dc6503-1c51-4909-a681-dbf8bf83bc13" alt=""><figcaption></figcaption></figure>

After successful compilation, the [ABI](https://docs.soliditylang.org/en/latest/abi-spec.html) and BYTE CODE will be displayed below, and you'll see a message in the console stating "Compile contract success."

<figure><img src="https://3745657014-files.gitbook.io/~/files/v0/b/gitbook-x-prod.appspot.com/o/spaces%2F-MYy-lqJKjq1m0yBAX4r%2Fuploads%2FczE48oDmrmEi2hNWpGds%2Fimage.png?alt=media&#x26;token=3f51d9b4-063e-48dd-a60e-b13b54bc0781" alt="" width="326"><figcaption></figcaption></figure>

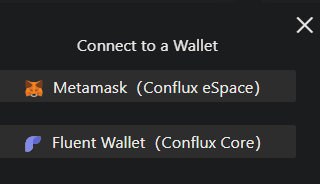
## 3. Connect to Conflux Chain

Before deploying a contract, you need to click on "Connect Wallet" in the upper right corner and select to connect to JavaScript VM (used for testing, implemented in JavaScript) or Metamask (for deployment on the Conflux eSpace Chain blockchain) or Fluent Wallet (deployable on the Conflux Core blockchain)..

<figure><img src="https://3745657014-files.gitbook.io/~/files/v0/b/gitbook-x-prod.appspot.com/o/spaces%2F-MYy-lqJKjq1m0yBAX4r%2Fuploads%2FLRhasXHh6XnfX6AsxOko%2Fimage.png?alt=media&#x26;token=81c389b6-c8b0-43c2-a26e-7f5ee01d60c9" alt=""><figcaption></figcaption></figure>

<figure><img src="https://3745657014-files.gitbook.io/~/files/v0/b/gitbook-x-prod.appspot.com/o/spaces%2F-MYy-lqJKjq1m0yBAX4r%2Fuploads%2FIWzH30vGcUN9Xwif51wR%2Fimage.png?alt=media&#x26;token=09e41bc6-9272-4cf4-8a92-9127086a82e3" alt=""><figcaption></figcaption></figure>

After connecting Metamask or Fluent Wallet, a banner will appear in the bottom right corner guiding you to connect to Conflux.

<figure><img src="https://3745657014-files.gitbook.io/~/files/v0/b/gitbook-x-prod.appspot.com/o/spaces%2F-MYy-lqJKjq1m0yBAX4r%2Fuploads%2FLrcOXAxJulqJznsbaPHY%2Fimage.png?alt=media&#x26;token=81546849-035d-4d09-afca-6d66eb44754a" alt=""><figcaption></figcaption></figure>

<figure><img src="https://3745657014-files.gitbook.io/~/files/v0/b/gitbook-x-prod.appspot.com/o/spaces%2F-MYy-lqJKjq1m0yBAX4r%2Fuploads%2Foum1NkzIww9r93B76TAP%2Fimage.png?alt=media&#x26;token=968ab4b3-3a25-4aa1-9af7-bbf8a41d6b32" alt=""><figcaption></figcaption></figure>

## 4. Deploy a contract

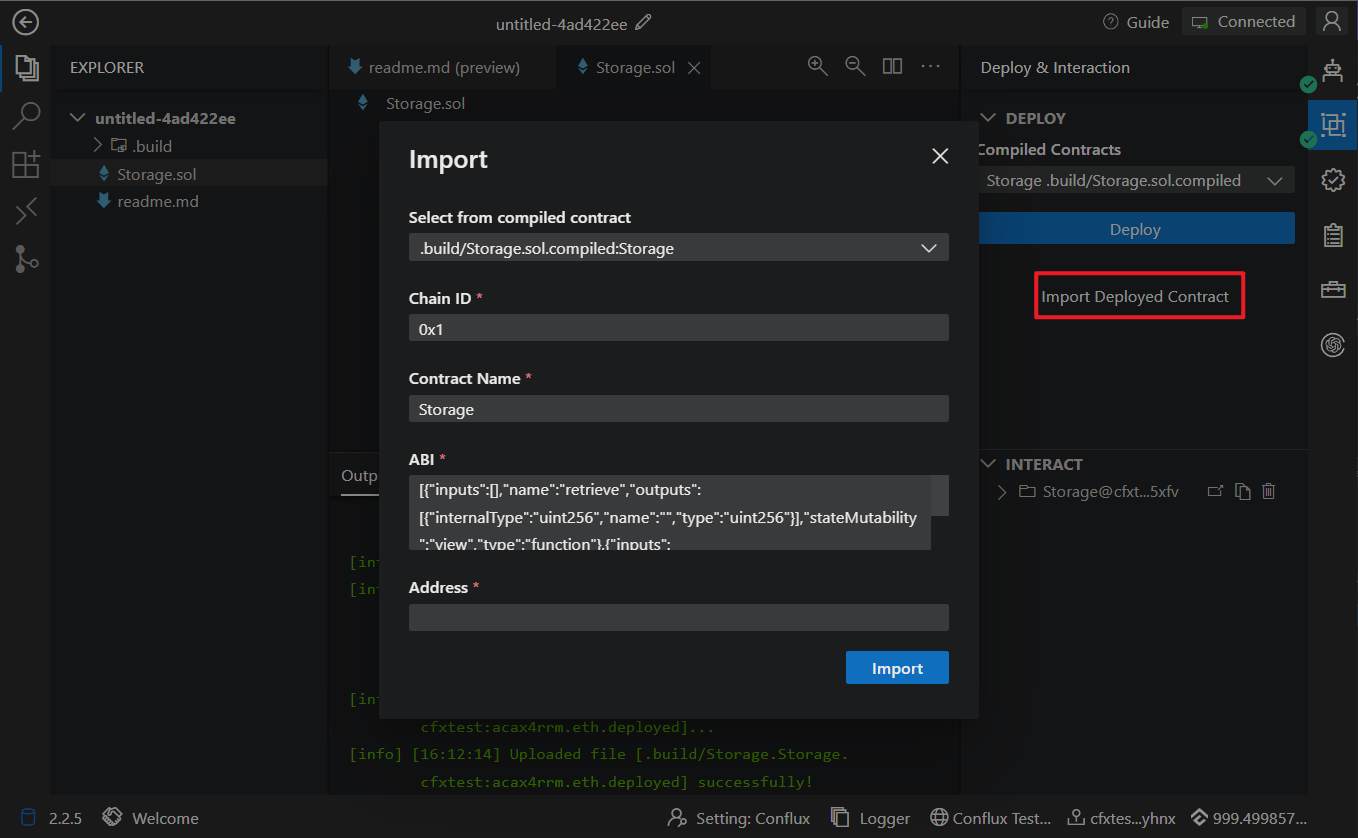
Click the "Deploy & Interaction" button on the right-hand side, which will bring up the deployment and interaction pages. Select the compiled contract and click "Deploy" to initiate the deployment (then confirm in Metamask). After successful contract deployment, the console will display the contract deployment result and relevant information.

<figure><img src="https://3745657014-files.gitbook.io/~/files/v0/b/gitbook-x-prod.appspot.com/o/spaces%2F-MYy-lqJKjq1m0yBAX4r%2Fuploads%2FkqEanWPUE87hSYSBzTPM%2Fimage.png?alt=media&#x26;token=bc180994-86d4-4f8c-be2e-f2793c83bd84" alt=""><figcaption></figcaption></figure>

In addition, you can click "Import Deployed Contract" to import a contract that has already been deployed for contract interactions.

<figure><img src="https://3745657014-files.gitbook.io/~/files/v0/b/gitbook-x-prod.appspot.com/o/spaces%2F-MYy-lqJKjq1m0yBAX4r%2Fuploads%2Fh2yCr2DQSV9uGVByFJTV%2Fimage.png?alt=media&#x26;token=460fe3ad-107f-4ee9-92cf-baecbfa88bbf" alt=""><figcaption></figcaption></figure>

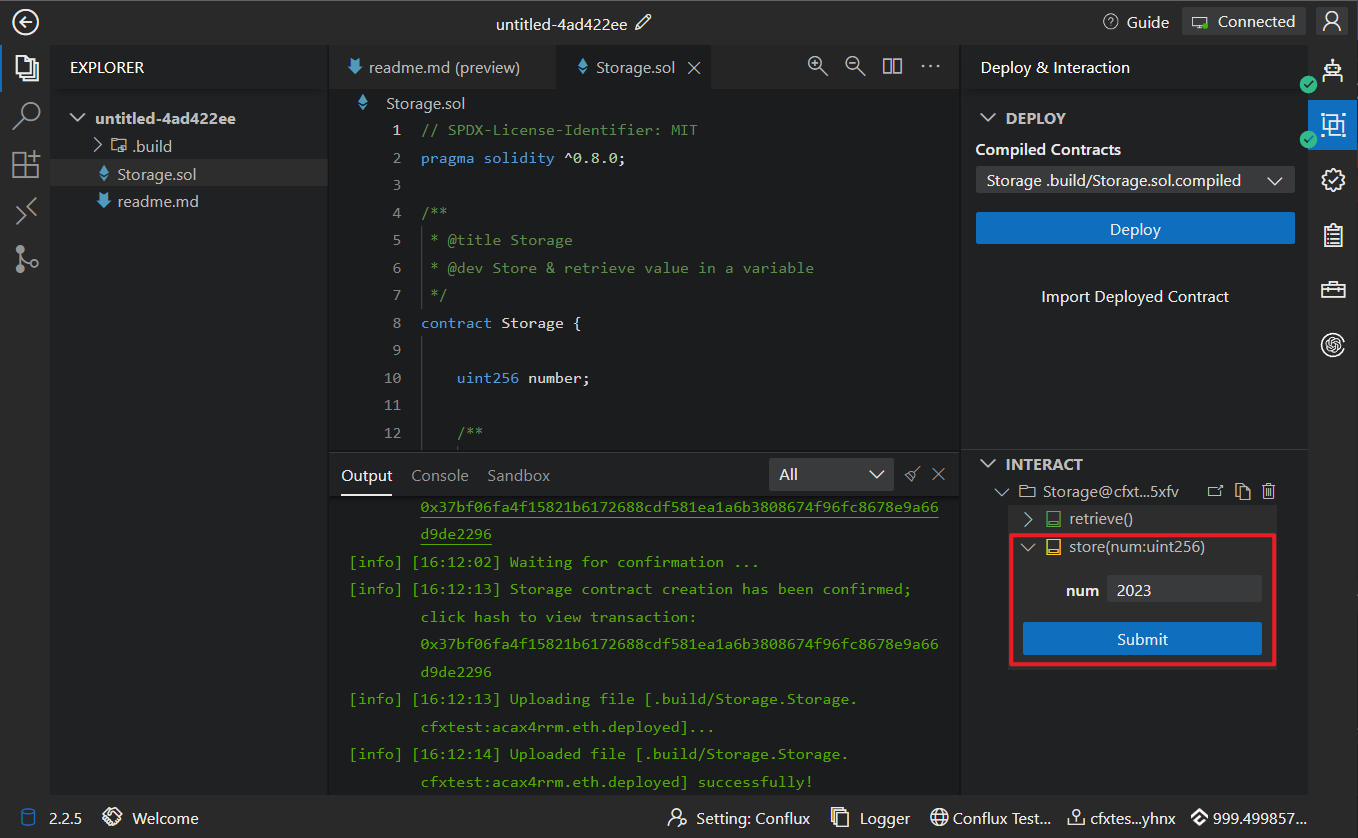
## 5. Contract interaction

After a successful contract deployment, you can interact with the contract. Click on the deployed contract, choose the corresponding interface, and click "Submit" or "Get" to perform interactions.

<figure><img src="https://3745657014-files.gitbook.io/~/files/v0/b/gitbook-x-prod.appspot.com/o/spaces%2F-MYy-lqJKjq1m0yBAX4r%2Fuploads%2Fb2znjN8H6A1h55cObNLF%2Fimage.png?alt=media&#x26;token=49c2441b-ccf6-4312-abb4-4771b0644485" alt=""><figcaption></figcaption></figure>

## 6. Transaction Query

Click on the transaction hash in the Output section to view the specific details of each transaction.

<figure><img src="https://3745657014-files.gitbook.io/~/files/v0/b/gitbook-x-prod.appspot.com/o/spaces%2F-MYy-lqJKjq1m0yBAX4r%2Fuploads%2F2PVLqXGOLBSiJEgdZTkt%2Fimage.png?alt=media&#x26;token=20cacac5-ffda-4208-9756-8b07bc7fea1a" alt=""><figcaption></figcaption></figure>

## 7. Verify the Contract

If you wish to open-source your smart contract on a blockchain explorer, please refer to [ChainIDE Verifier](https://chainide.gitbook.io/chainide-english-1/chainide-modules/4.7-plug-in-system-module/2.7.3.-chainide-scan-verifier) or [ChainIDE Flattener](https://chainide.gitbook.io/chainide-english-1/chainide-modules/4.7-plug-in-system-module/2.7.2.-chainide-flattener-plugin).

## 8. Conflux Chain Sandbox

If you prefer using the command line for development, you can open the Conflux Chain EVM Sandbox, which comes pre-loaded with [Hardhat](https://hardhat.org/), [Truffle](https://trufflesuite.com/), [Brownie](https://eth-brownie.readthedocs.io/en/stable/), [Ganache](https://trufflesuite.com/ganache/), [Git](https://git-scm.com/) and [Node.js V16](https://nodejs.org/en).

<figure><img src="https://3745657014-files.gitbook.io/~/files/v0/b/gitbook-x-prod.appspot.com/o/spaces%2F-MYy-lqJKjq1m0yBAX4r%2Fuploads%2F0X4nQz4CueZgSlTiDy1h%2Fimage.png?alt=media&#x26;token=2a6b0cac-5df6-4605-8744-658f9cb3c5ac" alt=""><figcaption></figcaption></figure>

If you've started a process on a port in the Sandbox and wish to access that port, please refer to [ChainIDE - Port Forwarding](https://chainide.gitbook.io/chainide-english-1/port-forwarding).
